The Symbols (Bubbles) Ribalog- ZYS - ZY2
***********************************************
New in Version 4:
The symbols ribalog can now be set up to handle more than 1 set of mapping symbols or bubbles. Here are 2 different CMDEXT.def commands for opening the Symbols Ribalog with a different set of "bubbles"...
ScalzSymbols,ZYS,,Bubble Symbols,Bubble Symbols,DllName;scalz.dll;DllFunName;SymbolsRibalog;DllCmdLine;Mapping Button Symbols;DllRun
ScalzSymbols,ZY2,,Bubble Symbols,Bubble Symbols,DllName;scalz.dll;DllFunName;SymbolsRibalog;DllCmdLine;Mapping Button Symbols2;DllRun
Notice the commands in bold above. These commands tell the symbols ribalog which "set" of symbols to use which are defined in your Scalz.ini file...
[Mapping Button Symbols]
1Top=Arrow
2Top=Arrow
3Top=Arrow
4Top=Arrow
5Top=Label
1Bottom=Arrow
2Bottom=Arrow
3Bottom=Arrow
4Bottom=Arrow
5Bottom=Label
Radius=.3125
[Mapping Button Symbols2]
1Top=OctArrow
2Top=OctArrow
3Top=OctArrow
4Top=OctArrow
5Top=OctLabel
1Bottom=OctArrow
2Bottom=OctArrow
3Bottom=OctArrow
4Bottom=OctArrow
5Bottom=OctLabel
Radius=.3125
See the documentation below for where your symbols must reside and how the rest of this ribalog works. 2 Sets of Symbols that will work with the settings above have been included and installed with Scalz Version 4
***********************************************
***********************************************
New in Version 3:
The symbols ribalog has 2 new features...
1) Sequential text in bubbles... If you check the "Seq." box on the ribalog, the "Top Text" value will be sequentially increased by 1 each time you place a symbol. For example, if your "Top Text" is the letter "C" the first symbol you place will have the "C" as shown above. The next symbol you place however will have "D" as the "Top Text", then "E" and so on. Holding down the "Alt" button will allow you to sequence in a reverse order from the current value, and holding the "Shift" key will keep or "hold" the current value. This feature works both with Numeric and Alpha text. The "Increment" by which this value will be increased in controlled by the "Increment" value in the Sequential Text Ribalog.
2) Tracking from the last symbols position... Checking the "Tk." box will automatically allow you to place subsequent symbols using the ortho mode from the point the last symbol was placed.
***********************************************
The Bubbles ribalog is designed for placing "Mapping" symbols captions and labels on your drawings. It can save hours over conventional methods. All of the Symbols and Text placed with this ribalog are "Scaled" according to your text height so every Symbol will look the same no matter what the scale of your drawing.
Before trying to place any symbols, be sure your Scalz.ini file has been set up to point to the correct location of the symbols. Open the Scalz.ini and check the following setting...
[Symbols]
Path=c:\rogram files\cadd4\calz Imperial Symbols\
If the [Symbols] "Path" setting is correct, you should have no trouble placing your symbols. If your symbols do not attach to your cursor after clicking one of the buttons on this ribalog, this path is probably incorrect. Be sure there is a "\ (backslash) at the end of the path.
The left side of the ribalog is designed to create Arrows and Labels for guiding the viewers of your prints around from drawing to drawing. The left most edit box is where you can set the text you want to appear in the upper half of any Labels or Arrows you might place that contain one reference over another. This edit box also the one referenced when only one character appears in your bubble. The second edit box is where the text that will appear in the lower half of your double character bubbles.
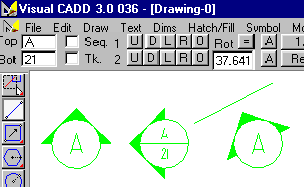
The top row of buttons currently labelled U, D, L, R and O (which stand for Left, Right, Up, Down and "O") are the buttons already set up to place arrows that point in that direction with a single character in them. This is indicated by the "1" to the left of the buttons meaning "1" character. The "O" button will allow you to place a "Label" or a "Circle" with the character in it. This text in these bubbles will be 2 times the size set in your Scalz.ini file to print at the Full Scale Text Height. A bubble placed with these buttons might look like the one on the left in the picture above.
The bottom row of buttons allow placement of the same bubble except that a line is drawn through the middle of the bubble and a character is placed both above and below the line. This text will be the size set in your Scalz.ini file to print at the Full Scale Text Height. A bubble placed with these buttons might look like the one that is in the centre of the picture above.
The edit box that is the furthest to the right above (below the caption Rot.) is used to set and display the current rotation of the symbols that can be placed with the two buttons to the right of the edit box. The rotation can be set by selecting the edit box and typing in the rotation you wish, or by clicking the "=" button above the edit box and selecting an existing entity in the current Visual CADD drawing. The rotation can be set to match lines, text, other symbols and hatches. Note that a different rotation is set according to which end of a line is selected. A bubble placed with these buttons might look like the one on the right in the picture above.
We recommend assigning the following script to a function key for automatically rotating symbols 90 degrees each time it is run...symrot;$symrot+90;
Tip: If you create quite a few symbols with the same text in them, and find later that you need to change that text, it can easily be done using the Replace Text Ribalog supplied with Scalz.
All of the buttons that place symbols on this ribalog can be customized. You can change the text that appears on them, and you can change the symbol that is associated with each button. These settings are set in the Scalz.ini file in the following areas...
[Symbols]
Path=c:\rogram files\msi\cadd3\rograms\wc\ymbols\wc\
TopDefaultText=A
BotDefaultText=21
Rotation=207.682°
[Settings]
LineColor=10
LineWidth=1
Layer=2
[Mapping Button Text]
1Top=U
2Top=D
3Top=L
4Top=R
5Top=O
1Bottom=U
2Bottom=D
3Bottom=L
4Bottom=R
5Bottom=O
[Mapping Button Symbols]
1Top=Arrow
2Top=Arrow
3Top=Arrow
4Top=Arrow
5Top=Label
1Bottom=Arrow
2Bottom=Arrow
3Bottom=Arrow
4Bottom=Arrow
5Bottom=Label
Radius=.3125
[Rotating Button Text]
Top=A
Bottom=A
[Rotating Button Symbols]
Top=Arrow
Bottom=Arrow
The [Settings] area (below) of the Scalz.ini pertains to the line that is drawn horizontally between the upper and lower halves of the Mapping Symbols or Bubbles.
[Settings]
LineColor=10
LineWidth=1
Layer=2
The right half of this ribalog is designed to help place other symbols needed when labelling and mapping your drawings.

The top buttons currently have the most common Architectural Scales associated with them whereas the bottom row of buttons has useful symbols for placement during the lettering and editing in your drawing sessions.
Again, all of the buttons that place symbols on this ribalog can be customized. You can change the text that appears on them, and you can change the symbol that is associated with each button. These settings for the buttons above are set in the Scalz.ini file in the following areas...
[Scales Button Symbols]
1Top=1_8 Inch
2Top=3_16 Inch
3Top=1_4 Inch
4Top=3_8 Inch
5Top=1_2 Inch
6Top=3_4 Inch
7Top=1 Inch
8Top=1 1_2 Inch
9Top=3 Inch
10Top=Half Size
11Top=Full Size
1Bottom=Rev1
2Bottom=Rev2
3Bottom=Rev3
4Bottom=Rev4
5Bottom=Grain
6Bottom=CL
7Bottom=Approved
8Bottom=Plan
9Bottom=Detail
10Bottom=Section
11Bottom=Elevation
[Scales Button Text]
1Top=1/8
2Top=3/16
3Top=1/4
4Top=3/8
5Top=1/2
6Top=3/4
7Top=1
8Top=1 1/2
9Top=3
10Top=Half
11Top=Full
1Bottom=Rev1
2Bottom=Rev2
3Bottom=Rev3
4Bottom=Rev4
5Bottom=Grain
6Bottom=C Line
7Bottom=Appr'd
8Bottom=Plan
9Bottom=Detail
10Bottom=Sect'n
11Bottom=Elev'n
Created using Helpmatic Pro HTML