Before we go on it should be noted that in this example, the text height for a full size (full scale) drawing is 1/8". Also, to make the symbols scale properly, for a full-scale drawing we multiply the text height by 8 to compute the symbol scale. Thus the equation....
(Text Height) 0.125 * 8 = 1 (Symbol Scale)
Or
(Text Height) 0.25 * 8 = 2 (Symbol Scale)
We all have printers that will accept different sized paper, but for each project, it is normally known what size pages we need to produce. Now, to create a drawing, follow these steps...
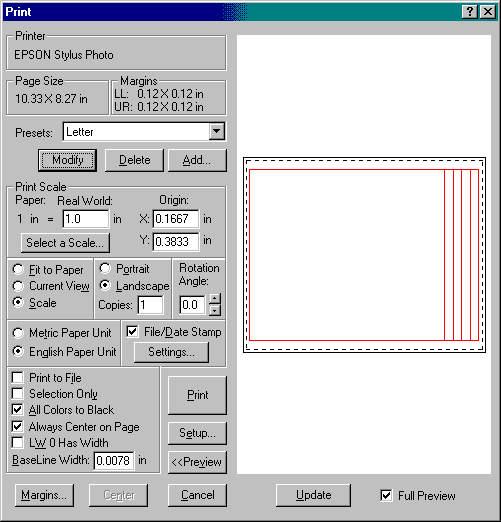
1) Create a single TitleBlock Symbol that fits the size paper you are going to use for this project. Make the symbol so it prints correctly on, or borders your page when the print scale is set to 1 and leaves you the maximum drawing room on your page. See the picture below. Be sure to save your symbol and make note of the path to where you placed it. This symbol will be used for the titleblock for all of the future drawings printed on this size paper no matter what the scale.
2) Whether it's a simple floor plan or complex drawing containing plans, elevations, sections and details, draw and position all of the views BEFORE you start to dimension the drawing or add text or leaders. This is the secret to success because now the rest of the steps become easy...
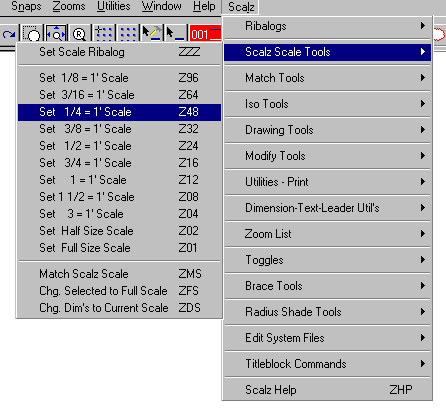
3) Now that you know what is going to be on the page, select the "Scalz Scale" from the menu (see below) that you think will best fit your drawing. The "Scalz Scale" sets up the size of your text, leaders and dimensions. See the Initial Setup topic to learn more about these Scale settings.
4) Now, place your titleblock symbol into your drawing. Your symbol should be "scaled" according to the scale you selected, for example: If you selected 3" = 1' this is the same as a scale of 1:4. Set your symbol scale to 4 and place it using the YP (Symbol Place) in visual CADD. If when you place the symbol, it looks too big or too small for your drawing, erase the symbol, reset the "Scalz Scale" in the menu and try the next scale for your titleblock. We recommend that you place your titleblock symbol in the same place for every drawing like the coordinates 0,0. Then move your drawing to fit within the border. You can use the following script to place and size our titleblock automatically.
uioff;MO;SYMROT;0;SYMSCX;$TEXTHEIGHT*8;SYMSCY;$TEXTHEIGHT*8;FileName;c:\rogram files\cadd4\ymbols\itleBlock.VCS;SymPlace;0,0;ZA;uion;
Below is an explanation of the Script...
uioff;MO; Set the user interface off and set up to measure from the origin
SYMROT;0; Set the symbol rotation to 0
SYMSCX;$TEXTHEIGHT*8; Set the symbol X scale
SYMSCY;$TEXTHEIGHT*8; Set the symbol Y scale
FileName;c:\rogram files\cadd4\ymbols\itleBlock.VCS; Set the path and name of the symbol
SymPlace;0,0 Place the symbol at the coordinates 0,0.
;ZA;uion; Zoom All and set the user interface back off.
Using this practice of placing your titleblock in the same place every time allow you to utilize tools like Place Text which will place text from ASCII files into your drawings at the same place every time. Please read the Place Text Tutorial to learn more about this powerful feature.
Since you set up the "Scalz Scale" earlier, you can now use all of the Scalz tools to speed up the completion of your drawing. All of these tools size entities as they are placed into your drawings at the proper "Scalz Scale".
Place Text - Automatically place text in your drawing at fixed positions according to the current text height.
Symbols Ribalog - Place symbols (bubbles) in your drawings and the symbol scale is set according to the text height and the bubbles are filled in with the text you choose automatically.
Draw Clouds - Draw revision clouds. The size of the arcs is based on the current text height.
Leaders Ribalog - Create leaders and have the text, offsets and arrows come out the same size in all scales.
These tools help in either getting your drawings to the proper scale, or help print your drawings at the proper scale.
Change Dimensions to Match Current Scale - If you started a drawing, and need to change the print scale because it became larger or smaller so your text is the wrong size, this tool will fix it!
Scale Selected to Full Scale - When creating details, there is a frequent need to scale entities to full size. This tool works from the current text height and scale all the selected entities to full scale.
Match Scalz Scale - Select one dimension, text line or leader and set the current scale to match it.
Store the Print Scale in the Drawing Header - this must be done before any of the Scalz printing tools are used.
Print at Current Scale - This tool simply opens the print dialog and automatically sets the print scale.
Batch Printing - Print an entire folder (directory) of drawings automatically using the print scale.
Batch Conversion - Create Other drawing types like PDF in a batch.
If you follow the suggested method above for creating all of your drawings, they will appear professional and consistent for you and your customers to read. Be aware that it is not mandatory that all of the text in your drawings be placed at the same size, only that the text height be set at the proper size when you use any of the Scalz tools. The Place Text tool gives you a "Text Height Multiplier" to place text of various sizes into your drawing. If for some reason you change your text height, simply reset the "Scalz Scale" by selecting the proper scale from the menu before using any of the tools above or the entities placed may not be the correct size for your drawing. There is no rule that says you cannot change the size of the text in your drawing and use the Scalz tools, but be aware of the effect of varying text heights.